1. Make sure you have version 2.0.0.67
or later.
2. Download fleur.zip and save to your DeskCNC folder.
3. Select menu Options - Misc, set the post Processor to 'ThreeAxisRotary'.
4. Select menu Setup - Machine Setup - Machine, set your machine to 4 axis w/ Rotary.
a. Set your machine to Millimeters for this Tutorial.
5. Select menu File - open STL - Open STL for Rotary and load the Fleur.Stl file.
a. All Rotary STL files should be oriented along the X axis.
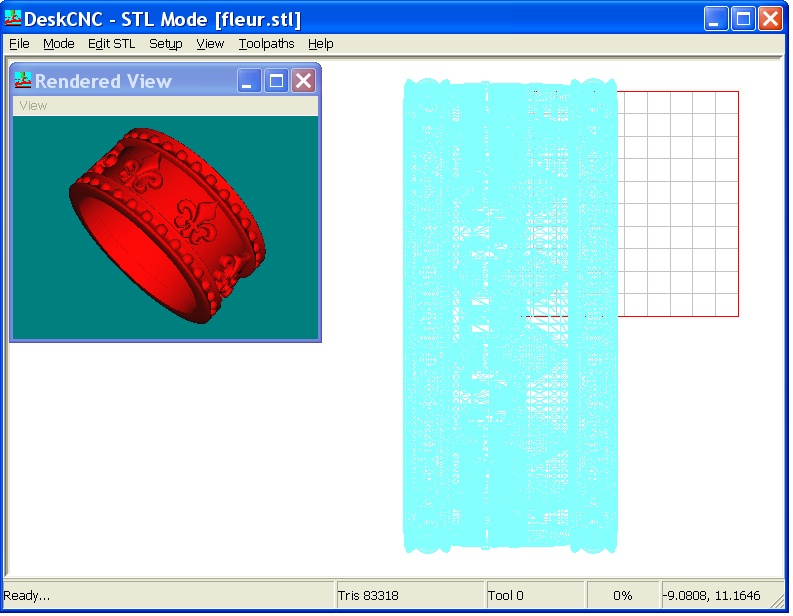
b. The screen should look like...

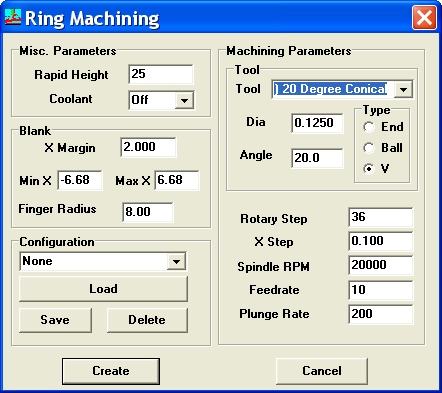
6. Select menu Toolpaths - Rotary and enter the following....
a. Rapid Height = 25 (should be higher than tallest point of STL model).
2. Download fleur.zip and save to your DeskCNC folder.
3. Select menu Options - Misc, set the post Processor to 'ThreeAxisRotary'.
4. Select menu Setup - Machine Setup - Machine, set your machine to 4 axis w/ Rotary.
a. Set your machine to Millimeters for this Tutorial.
5. Select menu File - open STL - Open STL for Rotary and load the Fleur.Stl file.
a. All Rotary STL files should be oriented along the X axis.
b. The screen should look like...
a. Rapid Height = 25 (should be higher than tallest point of STL model).
b.
Coolant = OFF.
c.
X Margin = 2. (The length along the X axis before and after the
Model begins and ends).
d.
Min X and Max X are automatically set.
e.
Min Radius = 8 (The minum depth of cut). This should be set so that
the Margins do not 'cut off' the part.
In the case of this Ring, it should be slightly less than the radius of the Finger Hole.
In the case of this Ring, it should be slightly less than the radius of the Finger Hole.
f.
Tool = 20 degree Conical (Dia, Angle, and Type are automatically set).
g.
Rotary Step = 360 (The number of steps to Index the Rotary axis: 360 =
1 degree increments).
h. X Step = 0.1 (The distance to step along the X axis).
i. RPM = 25000.
j. Feedrate = 400.
k. Plungerate = 400.
7. Your parameters should look like...

8. Click the Create button. It will take a
minute for the toolpaths to be calculated.
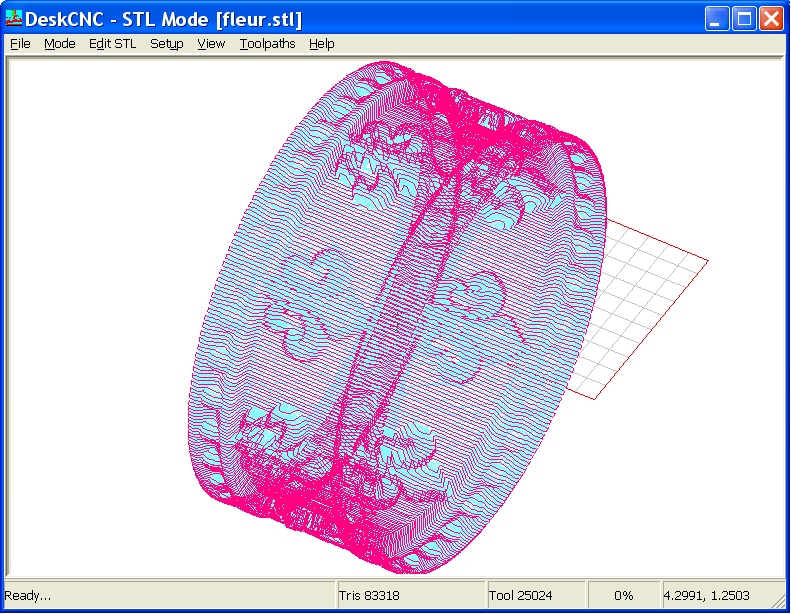
9. Your screen should look like this after rotating the toolpaths...

10. Select menu Toolpaths - Run Machine.
a. Accept the default filename and save the toolpaths.
11. The toolpaths are saved and automatically loaded.
12. If you have your machine connected, you can now run the GCode and machine the ring.
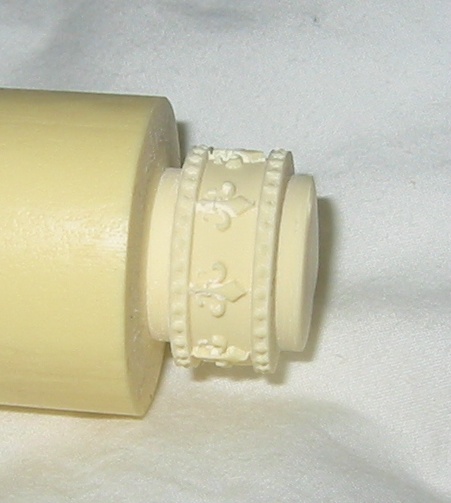
13. Here is the Ring machined in Urethane proof board using a Rotary Step = 0.1...

h. X Step = 0.1 (The distance to step along the X axis).
i. RPM = 25000.
j. Feedrate = 400.
k. Plungerate = 400.
7. Your parameters should look like...
9. Your screen should look like this after rotating the toolpaths...
a. Accept the default filename and save the toolpaths.
11. The toolpaths are saved and automatically loaded.
12. If you have your machine connected, you can now run the GCode and machine the ring.
13. Here is the Ring machined in Urethane proof board using a Rotary Step = 0.1...